Thursday, January 30, 2014

Happy Chinese New Year!

Happy Chinese New Year!

Actually, it’s tomorrow but it is never too early to show off some Chinese New Year themed crafts!

2014 is the year of the horse:

I got the pattern from here. Sorry, not an original creation. : P

A search on google was very sparse in terms of good crafts. Most of the results were geared towards kids and were either a simple Chinese lantern or some form of a dragon craft painted red. Therefore, I decided to look back at traditional Chinese handicrafts.  Unfortunately, I did not have the materials for most of them (I say this as if having bamboo sticks, silk screens, or embroidered cloth would make up for my lack of skill). The one that I could do though was the paper cutting. There are some beautifully elaborate patterns out there but since I was also watching TV at the time I was making these, I decided to not risk my fingers with something too challenging.

All these patterns are variations on templates I found on the internet. 

They are all very simple but I think they are still cute. 

Next year, I plan on making many, many more to hang around my house.
Dimensions: varies
Materials:  Red gift wrapping paper, red thread, tape
Tools: scissors, pencil
Time to Make: 2 hours

Cutting out these designs really brought home to me that an artist is sometimes only as good as her tools. My scissors were not the double sharpened, needle tipped scissors that Chinese artists traditionally used and I found that limited how finely I could cut my lines without ripping them. Clearly, I need to do more shopping if I want to take this art further. ; D

Thursday, January 23, 2014

January Birthdays

Sometimes you are inspired – I love it when that happens! You have an idea and you are excited about it. You have a vision in your mind about how it will look like and off you go!

Unfortunately, the execution can sometimes turn out to be a little disappointing. Then again, every artist is her own worst critic.

My cousin Amanda was born in January and last weekend, I was invited to her birthday party. It was the perfect excuse to pull out all my crafting supplies and make a card. I had a hard time coming up with a design though. Most of the teenage card ideas had fashion as a focus and that did not quite fit what I had in mind. I did some brainstorming about the number 13 and aside from Halloween related things and a baker’s dozen, I was a little at a loss. I thought of drawing a cartoon version of my cousin sitting on a mountain of bread but then thought – who was I kidding? My cartooning skills are not that good.

Anyway, I was flipping through my paper stock when I came across my unopened BazzillBasicsPaper™ DivinelySweet paper pad. The patterned papers are double sided which meant that both patterns would have be to my liking because I did not want to waste one side by mounting it on another piece of card stock. My eye was caught by the Flower Power Teal/Flower Power Cameo sheet. Sweet yet subtle blue on one side – full blown princess pink on the other. I thought, Under what circumstance could you ever use this? That is when the contrast struck me as short of genius. 


I really love this card but I am also not 100% happy with how it turned out. If I ever make this again, I would definitely choose a different font for “Amanda is turning…”. I would also layer the Flower Power Teal paper and the “13” onto another piece of cardstock and have the words on a lighter, plainer background.  The contrast would help the words stand out. I would also have fewer glitter jewel stickers – I find them a little overpowering.

All that being said though, I am still very proud of the idea behind this card. It is one of the few times that I feel that I have come up with something clever.

The birthday party was also for my cousin’s grandfather so of course, I also made a card for him. His design is a lot more simpler but I feel the clean and neat feel of it is suited to a dignified 80-something year old gentleman.


After making several cards, I am starting to get a feel of my weaknesses and the one that bothers me the most right now is my lettering. Time to pull out my pens and start practicing. 


Just bought myself a set of these for about $10.00 at Costco! Just look at all those pretty colours... : )

Thursday, January 16, 2014

Beaded Seal Take Two

Recognize this little guy? He should look familiar. You can see his brother here. This one was made of glass beads from my forays in China. Much sparkly-er, and a little heavier than my acrylic one. 

He is my favorite design.

Although really, he is just a ball with fins and a tail. (As I have said in one of my early posts)

I just find his simplicity so cute.

I am sure there is some deep life lesson buried in that thought but we will leave it buried for now.

After making a few things with my glass beads, I have found that I really like the weight of them. The projects just feel more substantial and they look amazing in sunlight. I know what I’m getting the next time I head to China. : )

Dimensions: 4.5 x 4.5 x 2.5 cm
Materials: 4mm bicone white glass beads, 6mm round black glass beads, clear fishing line, black fishing line, clear seed beads
Tools:  scissors, ruler, hands!
Time to Make: 2.5 hours

I would like to buy myself a glass cabinet from IKEA so that I can display all my crafts. With just the right lighting, they would look incredible! 

Thursday, January 9, 2014

Baby Showers! So Cute...

Two weeks ago, a friend had a baby shower. My sister and I bought her a plush giraffe with a matching blanket. We found out from my friend’s sister-in-law that the gift would match their nursery which had a large giraffe sticker on the wall. Well, to make it a complete matching set,  of course I had to make a giraffe card to go with it!

I copied the giraffe from a baby shower card I saw on the internet. Animals and pastel colours are the staple of baby-related paraphernalia. I can see why: the combination is so adorable!  The next time I draw a cartoon for a card though, I'll be sure to use a thicker pen for the outlines. I used a thin line sharpie the first time and then tried to thicken things with a brush pen. I have mixed feelings about the result. I coloured the giraffe in with coloured pencil and keenly felt my lack of practise. The finished image was not as smooth as I would have liked however, I do like the blended colours. Overall, I am quite pleased with how cute he is. I added a stamped sprig of leaves to balance things out.

I used Disney font for the words and freehanded them. If I had planned things out a little better, I would have left a wider yellow strip on the left. Luckily, I could still get everything to fit properly on the card. Lesson learned: plan out card before gluing any of the elements down.


I am fond of cards that open horizontally. 
A stamped element inside the card livens things up doesn't it?

The previous two pictures were scanned but these two were taken by my camera.

I think my card looks a little better in the photos than the scans because you cannot see the subtle imperfections. (Ah, the wonders of a little lack of clarity ; P)


Materials: Pastel yellow cardstock, white cardstock, green with white polka dots acid free paper from the amy tangerine® American Crafts™ paper pad,

Tools:  scissors, ruler, Exacto knife, Recollections™ clear stamps, coloured pencils, Martha Stewart Crafts™ stamps

Time to Make: 2.5 hours

I had not pulled out my card making supplies in a while and so I was a little surprised to see how much I had. I really should not be since I bought it all *grin*. Clearly, this is a sign I really need to craft more to bring down my stash.


Thursday, January 2, 2014

Happy 2014!

Happy 2014! *Blows a party horn and throws confetti* I love New Year – so much potential, so many possibilities…so many potential crafting possibilities! My Pinterest boards are loaded with plans and my craft supply cupboard is bursting. I am all set!

Every year, I make a bunch of New Year’s resolutions and even if I rarely carry mine through the whole year (*blush* I am a bit ashamed to admit…), I still love making them. Hope springs eternal  ; )! This year, I fully intend to have at least one post up on this blog each week. They will be released every Thursday simply because Thursday has always been and still is my favorite day of the week. Everyone can also look forward to Allison finally posting up some of her creations. She knits the cutest things and I always feel like I am dragging an elephant up a hill trying to get her to show them off.

This year, I am also going to try taking some ‘work in progress’ photos and maybe even create a tutorial for something. All big plans!

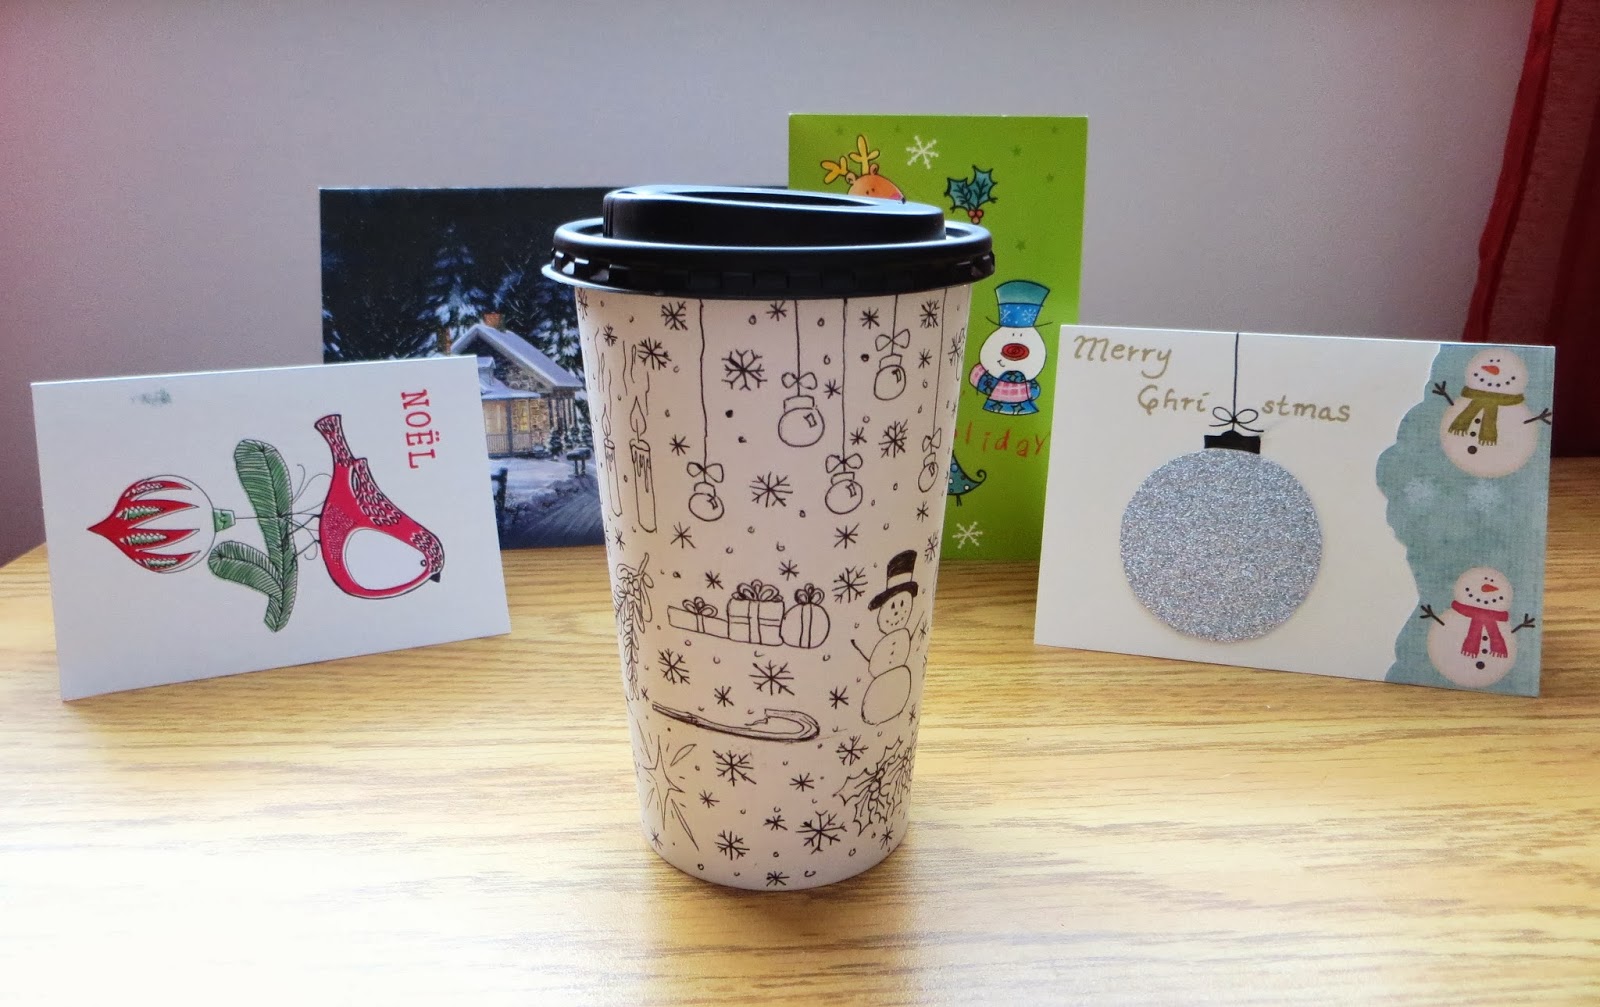
I was really not sure what to post as my first crafting diversion of the year but I figured a winter theme was a must. This doodled coffee cup was completed thanks to a 3-hour church annual general meeting. My friend had bought a coffee from a local shop and the entirely blank paper cup was irresistible to my pen. This was definitely an impromptu craft and when life hands you an opportunity like that, you cannot pass it by. I would have preferred a sharpie but I suppose one cannot be too picky under the circumstances. As you can see, I am so productive at meetings ; D!


See that sparkly Christmas card on the right with the ornament and the snowmen? That is a handmade card from a friend of mine in Thunder Bay. I have craft-y friends : )

I am not a doodler by nature and I have not seriously drawn something since high school so I was feeling a bit rusty with my scribbles.  I am going to have to start decorating the margins of my notes more often.

My friend was kind enough to shoot a video of my rotating coffee cup because you really cannot appreciate the full effect of the wrap around doodles in the photos.


From both Allison and me, we want to thank all of our family and friends who have been reading our blog. Of course, if anyone else out there is also reading, thank you to you also. Onwards to a craft-y (crafting…?) New Year!